How to...
This is the practical hands-on section of the website. Here you will find information, guidelines,suggestions, procedures, checklists, tips, shortcuts, landscape plans ...etc. to make your biblical garden thrive.
How to Make Papyrus
In keeping with our new international outlook, Doctor Bez and William Moran have started communicating with Bible Garden Societies and Groups abroad.
A remarkable one is the Group FlowerPower based near Kiel, Germany. They have a splendid web-site and have given us permission to translate their work for English readers.
Here is their illustrated guide: How to Make Papyrus, translated for you by William Moran.
You will need
- a dozen papyrus stalks each about one yard long (two stalks per sheet)
- blotting paper (good paper towels will do, they can be dried and reused)
- a sharp carpet knife
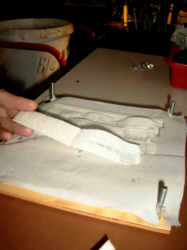
- a flower press (see picture below; these can be bought from a craft store or you can make one for yourself with a pair of cutting boards, four wingnuts and four carriage screws) a flower press is shown
- a large furniture clamp to add extra pressure to the center of your flower press
 1) Cut the papyrus stalks in to lengths to fit your press

2) with the carpet knife, peal the green outer layer away from the white center

3) slice the white center lengthwise into 1/16" (1 - 2 mm) thin strips. Every sheet of papyrus will require about 30 strips. Each papyrus stalk should yield about 10 strips
 4) cover the bottom piece of your flower press with blotting paper; onto this create a layer of papyrus strips by laying the ones you cut side by side with a one mm overlap until the paper is covered. This will require about 15 strips
 5&6) lay another 15 strips atop the first layer at right angles to the ones comprising the first layer


7) cover both layers with another piece of blotting paper; these will absorb the liquid pressed out of the papyrus.


8) press the sap from the papyrus layers; lay the top of the flower press carefully on the assembly so as not to disturb the layering arrangement Press Hard!
Leave the press closed at least one day.
 9) Open the flower press. Carefully remove the papyrus sheet from the lower blotting paper. If any too much moisture remains, perform step 10, below. If almost dry lay the papyrus sheet on a dry, clean, flat surface until dry (step 11)

10) If the paper is too thick and too wet and moist, repeat the pressing process with fresh blotting paper until the paper is dry. the plant sap forced into the strips provides the glue holding the papyrus sheet together
11) When hardly any moisture remains, lay the papyrus sheet on an absorbent flat surface to finish the process

The finished result You can trim the edges. This is a nice product your garden can offer for sale or for gifts or simply use. the paper has a distinctive color and elegant texture quite unlike any other writing medium in common use today.
for the original text go to: http://www.bibelgarten.com/Papyrusherstellung.htm
Views: 3
How to pronounce Latin botanical names
It can be discouraging if not intimidating to know how to pronounce the Latin names of these biblical plants. Here is a wonderful site that will make that easier. The staff here at the BBGS use this marvelous resource regularly. We found that after frequent usage we became more and more confident in employing the Latin terms in our teaching and presentation.
Try it. You'll like it. Connect here.
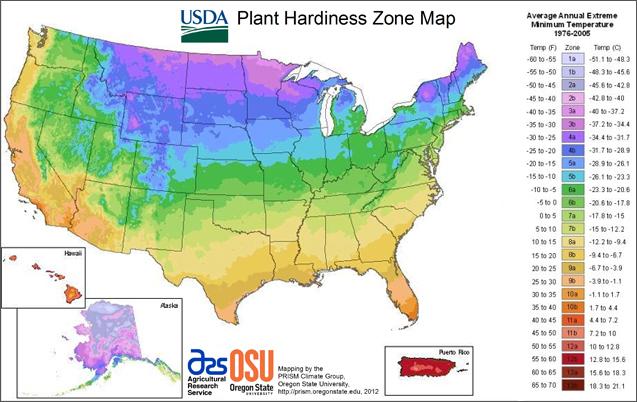
How to determine what flora to plant in your area
This is the new USDA Plant hardiness Zone Map (2012) Be sure to is the new map as older versions are now obsolete.
This is a recent World Climate map. Bible plants grow well where it is green or orange.

How to Plant your Seeds- Shirley Pinchev Sidell
Instructions for planting your seeds
Each seed whether tiny or huge holds the miracle of life and contains the beginning of a new plant. If handled correctly most of the seeds will grow into beautiful plants. Some seeds are easier to start than others and we have tried to include only the easy ones for our garden kits. Please read the following direction to insure that your seeds will be given a good change to germinate (grow) and give you years of beautiful plants and flowers.
Before you can begin planting, you'll need to determine your seeds' requirements, how deep you should plant them, whether they need light or darkness to germinate (start to grow), how long they take to germinate, whether they need any pre-treatment, such as soaking and when they should be planted.
We have included some of the necessary information for starting your seeds on our seed packets. Please read the instructions carefully and if you have questions you may email your questions to our gardening forum and one of our gardening experts will reply quickly.
Here are some general directions that will help you start your seeds.
Planting depth. As a general rule of thumb, plant seeds about twice as deep as their width. A pea seed, measuring 1/4", should be planted about 1/2" deep, for example. But your best bet is to follow the planting instructions on the seed packet.
Light requirements. A few types of seeds need light to germinate. Of course this means you can't bury the seeds! Instead, simply press them onto the surface of moist soil. Other types of seeds need complete darkness, so you may want to cover the newly-planted container with moistened newspapers or cardboard. If there's no mention of light or darkness requirements, it's safe to assume the seeds aren't fussy about this.
Germination time. Seeds can take anywhere from a few days to a month or more to germinate. Note this carefully for each variety, so you won't give up on seeds that have a longer germination time.
Pre-treatments. Some seeds -- especially those with hard seed coats such as morning glories -- will germinate faster if they are pre-treated. Treatments include soaking for several hours or nicking the seed coat with a file so it will more readily absorb water (called scarification). Another type of pre-treatment is a period of chilling (called stratification). Again, read the seed packet for special instructions.
Planting time. Most of the seeds in our packets may be started outdoors following the last frost. This is called Direct Sowing. Other seeds may be started indoors and the new plants are set out after the last frost. Remember the Holy Land is a Mediterranean Climate with mild winters. You do not want to have your tender seedlings killed by frost. The perennial and annuals included in the wildflower kit can all be directly sown where they are to grow if you prefer. Properly sized plants (2-5 inches) will transplant more readily and actually grow faster in the garden than oversized plants.
Seeds that germinate better in complete darkness (covered with soil): coriander fennel parsley tomato Callendula larkspur sweet pea poppy and nasturtium.
Seedlings that Don’t Transplant Well: If you must start these as seeds indoors, use peat pots or paper pots to limit root disturbance: poppies sunflowers morning glories lavatera annual phlox nasturtiums beans corn cucumbers dill fennel melons parsnip parsley peas radishes squash.
How to Growing Figs from Cuttings
There are some 120 different types of plants mentioned in the Bible, but few of those plants are more easily recognized than the fig. The fig is remarkably easy to grow because it roots quickly, making it an ideal plant for a garden, park, or home landscape. There are several propagation methods to choose from; the easiest method is to take root cuttings in the spring.
Potting Your Fig Plants
To start, take cuttings about 6 inches long and pencil to finger thick. If the weather is still unsettled and frost is likely, store the cuttings in a sealed zippered bag in the produce bin of your refrigerator. However, if the weather is warm and likely to stay warm, pot your cuttings. Place a half sheet of newspaper tightly into the bottom of a 4 or 6 inch-deep plastic pot. Put a little sand or a good-quality potting mix in the bottom of the pot, then stand one to four cuttings upright in the pot, and fill the rest of the pot with more sand or potting mix.
Water the pot thoroughly and place it in very bright, but indirect sunlight. The atmosphere should be at least 70 degrees F. If you cannot keep the air temperature above 70 degrees, provide bottom heat to bring the soil temperature up. Cover the pot with an empty 2- or 3-liter soft drink bottle with the lid on and the bottom cut out. Do not water the cuttings again until they are very dry. Lift the pot occasionally to test for dryness. If the pot is very light, sit it in a pan of water and let it soak. When you see vigorous growth, it is time to harden off the new plants. Remove the bottle cap and see how the plants do. Remove the bottle if the plants appear to be thriving after a few days. If the plants begin to wilt, cover them again with the bottle.
After a few days, it will be time to pot the new plants. Do not pot the plants because you see leaves growing. Sometimes there will be four or five leaves and a few, if any, roots. Wait until you see vigorous growth. Pot the plants in individual 1 gallon plastic pots and apply a light application of liquid fertilizer. In 4 to 6 weeks, depending on the vigor of the variety and the weather, the plants will be ready either for a larger pot or for in-ground planting. When you plant them in the ground keep them well watered until they have rooted well. This usually takes one summer of careful attention. A 2- or 3-inch layer of mulch will help the new plants conserve moisture, keep the new roots cooler, and provide cold weather protection in the winter.
Source: Jerry Chenault, Urban Extension Regional Agent,